I've been enjoying a slushy restored bench seat in the Falcon for about six years now. I have long flirted with the idea of switching to sportier, more supportive bucket seats and have had my eye on the Procar Pro 90 low backs for some time. They are super reasonably priced and look pretty good in all the ads. Recent events and revelations in my life finally prompted me to make the leap to bucket seats. I scored a set of seats and adapters from Summit Racing (No sales tax and free shipping...Woo Hoo!!!) and got to work.
Step one is to remove the old bench seat. To make it easier and less back-breaking, I unclipped both back rests, slid them off their pivot pins, then I wrangled the bottom out separately
The bench is still in good condition even after 6 years of unsympathetic daily use. I have now stored it up in the rafters of my garage for future use.
Cavernous interior. I vacuumed it and removed the floor mats to start with a clean slate.
The procar pro 90 seats come with the sliders loose, and they need to be attached with the included hardware.
Bolting the sliders on is a breeze. The frames are all pre-threaded and very easy to work with.
This is the connecting link that synchronizes the slider release from side to side
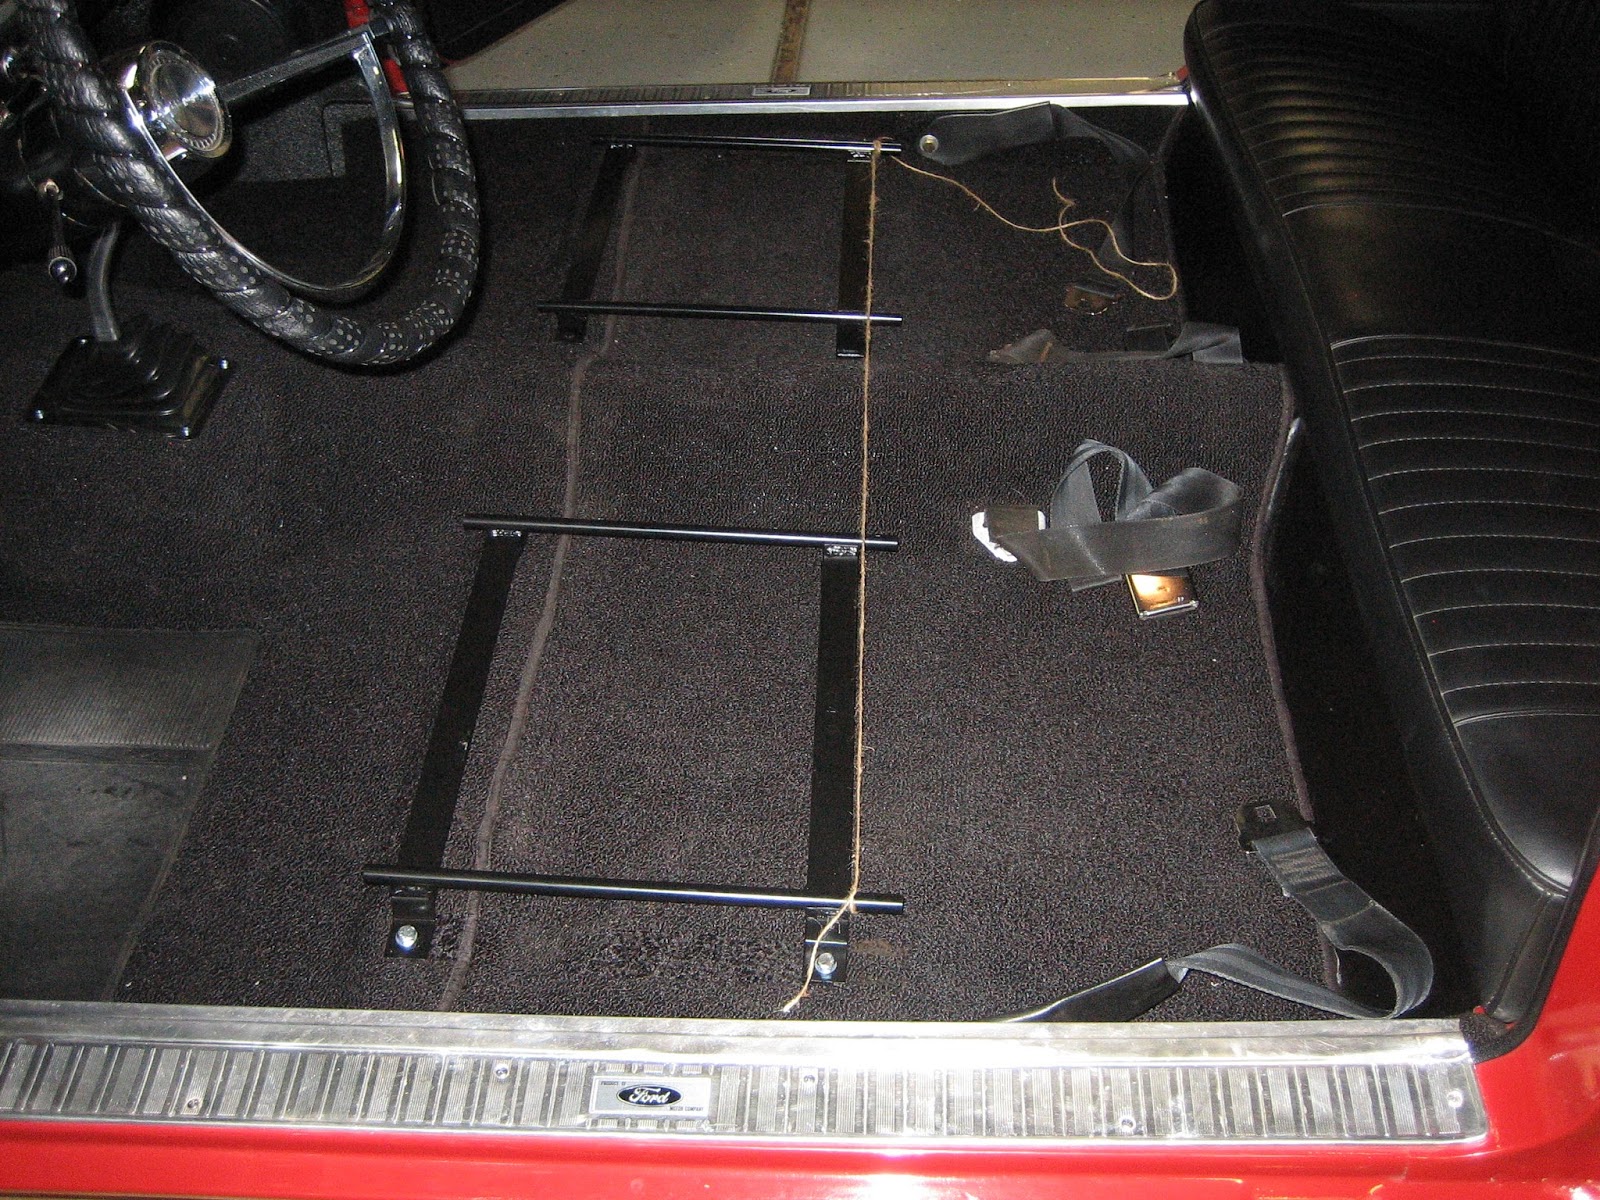
Both sliders in place and the connecting link installed.
I secured one end of the connecting link with a zip tie to prevent it from popping off as it tended to.
Procar offers adapter brackets designed specifically for the 1965 Falcon (and by extension I assume they "may" work for the 64 and 63) I waffled on buying these for about 7 seconds. If you weld, you can build your own with scrap metal, an old bed frame, or less than $20 in metal stock...and so can I, but I decided that the extra $65 each was worth getting the job done quickly.
I set the adapter brackets into place. My car, being an original bench seat car, did not have holes for the inner feet of the adapter brackets. It should be noted that the outer holes lined up perfectly though. Notice the string I stretched from side-to-side to ensure parallel installation, as there is a little "wiggle" room between the adapters and the factory floor holes.
I employed my old trusty hot poker technology to cleanly bore through the carpet in preparation for drilling holes in the floor. Don't skip this step, as drilling through carpet will ruin your carpet and make a tangled mess out of your drill bit.

Poker carefully melting the carpet
Clean hole in the carpet, in just the right place...I repeated this 3 more times in the remaining spots.
Here you can barely see the 4 new holes in the carpet, ready to be easily drilled for the attaching bolts
I start with a small pilot hole centered in the right spot, and then drill to the correct larger size.
A quick coat of semi-gloss black for the adapter-to-floor hardware. Note that this hardware is not included with the kit. It is expected that you will reuse your existing hardware, or choose new. Falcon can't swap the hardware, as it's integral with the original seat, so I purchased new from the hardware store.
Adapter secured to the floor, repeat for the other side.

Then the seats just bolt to the adapter bracket with the supplied hardware

At this point you can make adjustments to the mounting angle of the seat where it bolts to the floor adapter bracket, there is about a 1" range front and back.
plastic cover plate easily screws onto the recliner mechanism.
And that's that. Easy bucket seat installation! With the use of the procar adapter brackets, the install was less than an hour per side!
The seat back pivots forward to allow easy access to the rear seat with a flip of the recliner lever. Also notice the handy map pockets on the rear of the seat back.
The seat reclines back onto the rear seat. Good range of adjustability with tight increments.
To fill the void between the seats and add handy cup holders for my morning coffee, I picked up this sweet little console, made by TMI for 65-68 Mustangs.
The console is intended to "velcro" in place with the attached velcro straps. I wanted a more rigid and permanent installation. I cut off the velcro straps. I then made this bracket from a 1/8" steel strip about 8 inches long. I bent an inch of the ends up and conformed the middle to the driveshaft tunnel. I added some holes to secure it to the tunnel. I added holes on each bent up end to screw to the console.

I marked a spot on each side, approximately 4" from the rear of the console, where I wanted to attach the bracket inside the console. I used tape to protect the area and a small hot poker to bore through the vinyl and pad prior to drilling the mount hole.
Here the bracket is installed in the console, screwed in on each side, and also bolted to the driveshaft tunnel. There is one more screw at the front of the console under where the cup holder goes. This picture shows the console's lid, "false bottom", and cup holder removed.
It's a very tidy look and so far I am very pleased with how well it flows with the interior. The added storage is great too.
For the money, I haven't found a better looking console than the TMI unit.
Also note the cool chrome strip accent. for a few bucks less, you can get it plain, sans chrome if that's more your thing. It's also available in a wide array of stock 60's Ford interior colors to suit whatever kind of cool FOMOCO ride you are building.